
- All
- Pond Care
- Fountains Care
- Planters Care
- Statuary Care
- How to Build
Need Help?
If you have an issue or question that requires immediate assistance, you can click the button below to chat live with a Customer Service representative.
If we aren’t available, drop us an email and we will get back to you within 20-36 hours!
If you have other questions, please just send it to sales@marquisgardens.ca.
Pond Care
Most people will visit their ponds daily, particularly if they have fish. It can be during these times that a quick visual check should be done to ensure the pond is running properly.
All ponds vary when it comes to weekly pond maintenance. Variations include: size and style of the pond, size and style of filtration, water flow, amount of sunlight, as well, the presence of fish and plants.
The following Weekly Pond Maintenance Checklist is a guideline and can be customized to any pond or water feature.
- General Weekly Pond Maintenance
- Waterfall running optimally.
- Water level/no visible leaks.
- No large debris in the pond or water feature.
- Skimmer
- Remove debris from skimmer.
- Ensure skimmer pump is not clogged with debris/running smoothly.
- Check filter media for cleanliness.
- Pressurized Filter
- Perform Backwash.
- Ensure UV bulb is working.
- Ensure solids handling pump (feeding into the filter) is running properly/not clogged with debris.
- Ionizer
- Ionizer monitor is running properly.
- Check probes for cleanliness and quantity.
- Test water for copper levels.
- Up Flow Filter
- Check cleanliness of unit.
- Add beneficial bacteria (shut off UV for 24hrs when adding beneficial bacteria).
- Ensure all of the waterflow is directed into the pond and not leaking from the stream or spillway.
- Pressurized Filter
- Perform Backwash.
- Ensure UV bulb is working.
- Ensure solids handling pump (feeding into the filter) is running properly/not clogged with debris.
- Aeration
- Aeration unit is protected from the elements or indoors.
- Sufficient aeration for the size of pond and fish.
- Air stones are still intact and at the proper depth in the pond, air tubing has no leaks.
- Water Quality
- Water is generally clear, no debris, no murkiness, no heavy green tint.
- Use Testing Kit in early spring, also if noticing changes with water quality an/or fish behavior.
- String algae is minimal.
- Fish
- Behavior (Check for: gasping at the surface, flashing, motionless at the bottom, clamped fins, upright position.
- Physical appearance (no disease, markings, open wounds, pop-eye, bloating).
- Fish are feeding properly, using a quality fish food.
- Plants
- Fertilize plants if they have not been fertilized within the last month.
- Sufficient plant coverage for the pond if fish are present (between 10-50% coverage).
- Marginals, submerged and floating plants are free of disease and are thriving.
- Trim back any dying foliage or decompossing flowers.
There are five common types of pond leaks:
- A hole or cut in the liner.
- Leaking skimmer.
- Edge of the liner has receded or dropped.
- A leak from water being diverted out of the pond, usually in the stream or falls.
- A leak along the hosing, usually where there is a connection or pin hole
- Ensure your pond is full.
- Turn off all pumps and filtration.
- Keep aeration running if there are fish present in the pond.
You have determined that the leak is likely either:
- A hole/cut in the liner.
- A crack or leak from the skimmer.
- The edge of the liner has receded or dropped slightly.
You have determined that the leak is either water being diverted from the falls/stream or a leak from the hosing. Check along the hosing for any pin holes or cracks. Turn off your pond for a day or two then turn on and search for any wet areas along the hosing or near the falls to find the origin of the leak. A damaged hose can be cut and repaired using a coupling. A leak from the falls will usually require some shifting of rocks to redirect the water.
Drop the water level beyond the cut/hole to create an area that is at least an eight inch diameter around the hole/cut. Clean and dry the area perfectly. Cut patch into a circle to avoid lifting corners in the future. Use the scrub pad with primer and clean/prime the entire area plus a couple of inches beyond. Let primer sit for 10-30 seconds until it is tacky to touch. Remove the backing of the circular patch and adhere to the cut liner ensuring the hole is in the center of the patch. Use the roller to apply pressure to the patch and roll out any potential air pockets. Pay special attention to the edges of the patch. For added protection lap sealant or silicone can be used around the edges of the patch. Wait 30-60 minutes before adding water.
Option B: Edge of the Liner has Receded or DroppedOften if the edge of the liner has receded or dropped there will be a patch of moist soil or aggregate where this has occurred. This is usually a tricky leak to find as there are often larger rocks or boulders that need to be removed from the edge of the pond to see the edge of the liner. Once you have found the leaking area, the liner can be lifted/repositioned and backfilled to prevent the liner from slipping back. As well ensure edge rocks are not shifting over time and repositioning the liner to cause a leak.
Option C: Crack or Leak from the SkimmerDrop the water level below the skimmer. If there is a crack in the skimmer box it will likely have to be replaced. Usually the leak will be where the skimmer plate has been attached. This plate may have to be removed and resealed if this is the case. Ensure there is excess liner below the skimmer plate to keep the liner from stretching and tearing over time. Use a lap sealant to seal as it adheres to EPDM liner better than silicone. Also use lap sealant in the screw holes for a better seal.
Winterizing your pond starts in the fall before the leaves begin to fall. The procedures you follow will not be based on the calendar schedule, but instead on water temperature, first frost and when the leaves begin to fall.
NOTE: Have a thermometer handy to monitor water temperatures for fish feeding. September/October is usually the time when water temperatures will begin to drop.
Need To Know! For ZONES 4a-7a (GTA and surrounding area)

|
Pond fish and koi are able to overwinter in a pond that has a 42”-48” depth (or more) at it deepest point; as long as there is a pond heater and aeration supplied. For ponds that are less than 42”, fish can be brought indoors and kept in a holding basin with aeration and filtration |

|
A Pond Heater is used to keep a small hole in the ice through the cooler weather when a pond would usually freeze over entirely. It is not used to heat an entire pond, as this is unnecessary. A small opening must remain in the ice to allow for the release of harmful gases. Aquascape’s Stainless Steel Pond De-icer/Heater is only 300 watts and is thermostatically controlled. When the red LED light is on the unit is heating, when the blue light is on the unit is still on, but not heating, allowing for better energy efficiency and the ability to know if your unit is working. |

|
An aerator allows for an increase of oxygen in the water over winter months, hot summer months and at night when oxygen levels are generally lower. Your pond and fish are dependent on oxygen and with low running costs; it makes sense to run your aerator all year round. |

| 10 Steps to Prepare Your Pond for Winter | |
|
Cold Water Beneficial Bacteria - Begin Using Cold Water Bacteria once the water temperature has dropped below 50°F/10°C. This will aid in breaking down debris and sludge before winter sets in. |
 |
|
Change Fish Food - Once water temperatures have reached 50°F/10°C change to a Fall/Spring food that has a higher wheat germ content that is easier for the fish to digest in cooler temperatures. Stop feeding the fish all together once the temperature has reached 45°F (7°C). |
 |
|
Plants - All Hardy water lilies and submersible plants (parrot’s feather) can be dropped down to the deepest point in the pond for the winter. Cut back any foliage from the lilies to limit decaying matter in the pond. Floating plants like hyacinth and water lettuce can be removed and disposed of. Hardy marginals can be trimmed back, leaving approximately 2-4” of the plant from the base. Tropical water plants should be brought indoors in a sunny area and treated as a house plant, always keeping the soil moist or a tray of water beneath. |
 |
|
Aeration - Move air stones from the deepest region of the pond to half the depth of the pond or 2’ from the bottom for the winter. The air stones should not be near the fish or at the bottom of the pond, as they will transfer cooler air to where the fish are. |
 |
|
Net/Vaccum - If there are any loose leaves or debris in the pond, remove with a skimmer or pond net before the fish begin to go dormant. The less waste left in the pond over winter the better for the safety of the fish. A Pond Vacuum can also be used to clean the bottom debris from the pond. After the pond is clean, cover the pond with a net before the autumn leaves fall. This will save you a lot work removing the leaves by hand. |
 |
|
Pumps - Turn off, clean and store all pumps indoors in a pail or container of water; this prevents the seals on the pump(s) from drying out. If your pond is 4’ or deeper the pumps can be left at the bottom of the pond as an option. |
 |
|
Lighting - Remove underwater lighting before any freeze occurs or if your pond is 4’ or deeper submersible lighting can be lowered to the bottom of the pond. |
 |
|
Filters/UV - Remove the pressurized pond filter and do a thorough clean out of all the media. Store the entire unit indoors to prevent cracking/damage to the unit. Also remove any additional UV systems from the pond and store indoors. This is a good time to check if the UV bulb and/or filter media needs replacing for the upcoming spring and to clean the quartz tube housing. |
 |
|
Ionizer - Bring the head of the Ionizer in for the winter (the threaded part with the anodes) and clean off the anodes so they are prepped for spring. |
 |
|
De-Icer/Heater - Before the water’s surface freezes over entirely, float a de-icer/heater towards the middle of the pond or over the deepest area of the pond. Throughout the winter you will be able to see the LED light on the heater and know that your heater is working. |
 |
| * We do not recommend having moving water (pump running) in the winter, as it disturbs the fish by shifting the cooler water on top to the bottom where the fish should not be disturbed. | |
At some point during owning a pond, you have likely encountered string algae – also known as filamentous algae, blanket weed, hair algae or just pond debris or pond scum. String Algae is a common pond pest that can multiply quickly in the right atmosphere (warm water and plenty of nutrients).
In This Article We Will Discover
- What is string algae?
- How to quickly eliminate string algae
- How to naturally reduce string algae
- How to prevent string algae
What is String Algae? This is a type of algae that attached itself to rocks, liner and waterfalls. This algae takes on the appearance of string or hair like filaments and, if left untreated, can grow to long lengths within a pond. Sometimes, this algae will hold bubbles within its fibers and float to the surface of the pond, appearing more like a blanket weed. The best way to distinguish between the two main forms of algae in your pond - suspended algae (green water) and filamentous algae, is the following: you will be able to physically pick up filamentous algae or pull at it – whereas, suspended algae is simply green water.


Quick Fix for String Algae
As quickly as string algae can show up in our pond is about a quickly as we would all like for it to disappear. Unfortunately, most methods to get rid of string algae in our ponds involve time and patience. There is a product we recommend for fast removal of string algae in your pond. This product is not generally used as a full time solution for most, but does wonders when you need a quick fix for your algae problem.
 |
D-Solv Powder uses the power of oxygen to remove debris quickly from waterfalls, liners and the bottom of your pond
|
What Causes String Algae to Form in your Pond?
We have heard many different scenarios regarding people’s experiences with string algae; some have had it in their ponds since day one, some have it early spring and have it slow down later in the year or some haven’t had it since they built their pond and all of a sudden it has emerged years later.
There is always a reason for algae forming in a pond. String algae is caused by either one or multiple reasons below:
- Increasing Temperature of Water – increased sunlight – the sun feeds all plant life including pesky string algae;
- Heavy Nutrients in the Water – This can happen from many sources – most often fish waste/too much fish food, plants and debris breaking down in the pond or runoff from surrounding areas that contain fertilizers/nutrients (common after heavy rainfall);
- Low Levels of Bacteria – Having low levels of beneficial bacteria will cause more swings in water quality as bacteria acts to keep a balanced cycle;
- Pond Chemistry - Increase in PH and Phosphorus will lead to algae blooms – this relates back to fertilizers entering your pond, cut grass entering your pond and high fish levels as the most common sources.
Is String Algae Bad for the Pond?
String Algae – though not a beautiful sight to most pond owners – it is not always a bad thing in a pond. Short string algae (generally under 3”) or light coatings within the pond, are actually healthy! Koi and Pond Fish also enjoy snacking on this nutritious algae. However, once string algae becomes overgrown it can become harmful to a pond environment by reducing oxygen levels, so be careful that it doesn’t get out of hand!
Solutions to Prevent and Remove String Algae from your Pond
| Product Quick Overview | What it Does/When to Use |
|---|---|
D-Solv Powder
|
When to Use: Use D-Solv powder when you are looking for a quick fix for string algae. Works particularly well on streams and waterfalls. Application: Use once a week maximum and stick to the recommended dosing rates. On waterfalls and streams – turn water off, sprinkle the powder over the affected area, wait 20 minutes before turning the water back on. For inside the pond, sprinkle around the edges of the pond. How it works: D-Solv powder uses oxygen power to remove algae debris from waterfalls, streams, rocks and liner within the pond. Works great as a spot treatment too! Non-toxic to fish and plants (using the recommended dosing rates). One of the fastest algae removing treatments on the market that is fish and plant safe! |
Beneficial Bacteria
|
When to Use: It is recommended that you use beneficial bacteria once a week as a maintenance dose to keep a balanced pond environment. Beneficial Bacteria is particularly important when there are fish present in the pond. Long term solution. Application: Follow directions on the bottle. Add once weekly. Works best when there is aeration present in the pond. Turn off UV sterilizer (if present) for 24-48 hours every time you add bacteria as free floating bacteria will be destroyed with UV. How it works: Beneficial Bacteria is naturally present in ponds, however, when we add fish and feed those fish, our ponds cannot keep up with the load we have applied and this is why we boost our ponds with natural, beneficial bacteria. It also helps if you give this added bacteria plenty of surface area to adhere to by also adding extra media (bio balls, string media, filter media mats etc). |
Nualgi
|
When to Use: Use Nualgi if you are looking for a long term solution to algae without the use of UV or Ionizers. Nualgi is great for fish and plant health. Non Toxic Product. Application: 1 ml treats 1000gal! Treat early morning, once a week. Overdosing will not aid the pond. You will generally see results in 1-4 weeks. Works well with the use of beneficial bacteria and added aeration – no other products required. How it works: Within 3-5 hours of applying Nualgi to your pond, a bloom of Diatom Algae (good algae!) will develop. This algae is not visible to the naked eye and out competes blue and green algae in the pond for nutrients, thus starving the blue and green algae allowing it to die off. The diatoms lock in the nutrients and are then consumed by your fish creating a full cycle that not only benefits your pond water but your fish and plants as well! (Diatoms are a free floating algae that sink to the bottom of your pond where they are eventually consumed by your fish) Nualgi allows you to clear up nuisance algae, feed your fish less and increase dissolved oxygen levels! |
Barley
|
When to Use: Use Barley Straw early in the season as the results take time. Good for long term maintenance. Slow release. Application: Apply close to the surface of the pond where sunlight is available, oxygen must also be present for barley to work to the best of its ability. Best to use barley early spring – mid-summer (not as effective in fall) as it generally takes 6-8 weeks to see results. How it works: Barley works by slowly breaking down, becoming active and forming hydrogen peroxide in small doses that effectively work to inhibit the growth of algae. |
Increased Oxygen
|
When to Use: Aeration should be utilized at all times in a pond. Increased oxygen levels are beneficial to water quality, fish and plants during spring, summer, fall and winter. Application: Have your air stones approximately 2 feet from the surface of the pond in the winter months with freeze over to not disturb fish in dormancy. During spring summer and fall, air stones can be placed at the bottom of the pond for optimal dissolved oxygen levels. How it works: The natural nitrogen cycle within a pond requires oxygen to cycle properly. Oxygen controls nitrogen and phosphorus levels, which in turn, controls algae spikes. Aeration will aid beneficial bacteria in decomposing debris within the pond. Having higher dissolved oxygen levels in your pond is required for not only healthy and clear pond water, but also for optimal fish health and plant health. |
Ionizing System
|
When to Use: Ionizers are a great choice for the pond owner that is looking to have minimal work when it comes to keeping a pond clean and clear. Ionizers are specifically for string algae and can be used at anytime during the season to eliminate string algae. This is a mechanism that allows for pond cleaning with little to no hands-on work. Application: An ionizer is an easy install. It can be installed in-line with your hose with two easy connections or can hang in a skimmer where there is optimal water flow. How it works: An ionizer slowly releases Copper Ions into your pond using a probe that sits within a chamber. There is a monitor that allows you to adjust how much copper is being released. Copper probes are generally replaced every 1-3 years depending on use. Copper, at small levels, effectively rids your pond of string algae. One must monitor copper levels to ensure that the level does not become too high as this may affect fish and plants. |
Water Plants
|
When to Use: Water plants, when maintained, are always a good idea for a pond owner. In our warm seasons, plants compete with algae for nutrients in a pond and also help to shade the pond from increased sunlight. Application: It is a good idea to use a variety of plants in a pond. Hardy lilies are great as they are low maintenance, survive year to year, and provided beautiful blooms throughout the summer. Floating plants like hyacinth and water lettuce are great for surface coverage, particularly in the spring before lilies have had a chance to take off. These floating plants also have large root systems and multiply throughout the season. Finally marginals, particularly when planted in a bog region of the pond, provide beauty to the edge of your pond as well as great filtration through their root system. These plants also return year to year which makes them a great investment. How it works: Most water plants work in a multitude of ways to prevent string algae in a pond. First, many will provide shade (looking to cover approximately 50% of a full sun covered pond), shade will help prevent a surge of algae growth particularly in the high heat of summer. Second, their root systems compete with algae to take in nutrients from the pond, thus limiting algae growth. Finally they have the added benefit of playing a large role in the nitrogen cycle as they are required to consume nitrates that build up in the water. |
Other Ways to Eliminate String Algae
- Limit How Much you Feed your Fish - It is always a better option to feed your fish multiple times a day, smaller quantities of food, than once a day, a large quantity of food. Feeding small amounts at each feeding will prevent uneaten food and optimal fish health.
- Remove any Uneaten Fish Food - Fish food that is left floating in the pond, uneaten by fish, is a huge nutrient source for algae. A quick way to limit this source is to net out uneaten food (anything that is not eaten after 5 minutes of feeding) as well as clearing out skimmer nets that may have captured floating food.
- Feed Fish a Quality Food - Many people will underestimate the affect a cheap fish food will have on their pond and water quality. By feeding cheaper foods with fillers, fish will not retain much nutrient and their ill be heavy waste resulting from this lack of nutrient intake. By saving on fish food many pond owners will in fact pay much more to fix algae problems caused by low nutrient value in cheaper foods.
- Physically Remove Long String Algae - Before applying a water treatment to aid in your string algae problem it is a good idea to physically remove long strands by pulling them out by hand. If there is a large die off of string algae in your pond, this can adversely affect your water conditions; also, water treatments will be more effective on small portions of string algae as opposed to large portions.
- Avoid Large Water Changes – Stick to Small, Consistent Water Changes - Small water changes (10-15%) up to once every 1-2 weeks helps to renew specific minerals in your pond that deplete with time. Often homeowners will get frustrated with string algae – do a full pond cleanout – and are surprised to see more string algae return within a week’s time. When we do full or large water changes, we are essentially taking a mature pond with stores of beneficial bacteria and starting from scratch, which when it comes to ponds, bacteria levels are very important in controlling algae.
- Avoid Leaching into your Pond-Particularly During Heavy Rainfall - Many homeowners are unaware of the fertilizers and debris that enter their ponds via the surrounding landscape. During heavy rainfall, lawn fertilizers and debris often leach into the pond, putting a heavy strain on the water quality. This is particularly common with natural ponds that sit lower than the natural grade of the surrounding landscape.
- Don’t Overstock your Pond - Think of your pond like a city – cities that are overpopulated often have troubles with waste management due to lack of space – same goes for a pond. We often think ponds should be able to balance themselves like lakes – this would only be possible if our ponds were stocked like lakes. Instead, we add more fish than any lake would ever have and expect the pond to keep up. By adding heavier filtration or limiting the fish load in our ponds we can help prevent fish waste from adding to our algae issues.
- Remove Debris like Leaves and Dying Plants - Again – it is all about not giving string algae additional nutrients and food to grow off of. Decaying plants and leaves put a huge strain on the nitrogen cycle and end up producing more nitrates and nutrients than our filters and ponds can keep up with. Our best option is to ensure our skimmers are working optimally to remove any surface debris and to net out or pull out any decaying plant life or material within the pond.
When we are talking green water in the pond we are referring to suspended algae. Suspended algae are essentially small particles of algae that stay suspended in the water causing your pond to look like “pea soup” and not allowing you to see clearly to the bottom of your pond or see your fish. Let’s work on transforming your pond from!
| From this | To this |
|---|


Many people are initially looking for a ‘quick fix’ to their green water problems and this is where we will address a product called Crystal Clear Pro Fix (Formerly known as D-Solv 9). This liquid product can be added once a week and can clear up your green water in as little as 24 hours.
|
Pro Fix (D- Solv 9) cleans and clears pond water in as little as 24 Hours.
|
What Causes Green Water?
Once you realize that green algae is a plant, it becomes easier to see what feeds that plant to grow and multiply in your pond. Green water requires sunlight and nutrients to thrive – thus it makes sense that a pond in full sun with no coverage will likely have more algae than a pond in the shade or with plant coverage.
The tricky part is realizing what nutrients may be entering your pond to feed the algae. Below are a few of the most common reasons for green water in your pond along with proactive tips to reduce the problem.
| Potential Cause of Green Water | How to Prevent the Issue |
|---|---|
Too Much Sunlight Exposure/Pond is in Full SunAquascape Pond Dye |
For most, it is not a viable option to move ones pond to a different location – so to create more shade in the pond there are 2 options that work great: Pond Dye – fish and plant safe, pond tint will add a hue of blue or black to your water to help filter out sunlight and many love the hint of colour as well – not to worry you will be able to see your fish easily through the tint as it is translucent! |
Low Quality Fish FoodCrystal Clear Platinum Koi Food |
|
Bacteria and oxygen levels are lowMicrobe-Lift BacteriaPond Aeration Kit |
Beneficial bacteria and oxygen are two vital components of a healthy pond and luckily both work in conjunction with one another. Beneficial Bacteria require oxygen to thrive and multiply. Both occur natural in ponds and lakes – the difference with ponds is that we overload much beyond that of a lake and expect mother nature to keep up – unfortunately, this rarely happens! Lucky for us we can add aeration and beneficial bacteria to help Mother Nature along. Without enough bacteria and oxygen not only can the water become toxic to fish, but algae in the form of green water can fluctuate to unsightly levels as well. This is what we mean by looking for a balanced, mature pond with sufficient bacteria and oxygen to allow the pond to flourish. |
Too Many Fish in the PondAquascape BioBall |
Too many fish is a common problem – sometimes fish multiple and grow faster than we anticipate. When this happens, the pond can no longer support the excessive waste coming from the overpopulation – it would be similar to an overcrowded city with excessive waste. In the case of a pond, excessive waste feeds the green water and can lead to harmful water quality that can be detrimental to the fish. How to combat overpopulation? Some will increase the size of their pond and others will part with some of their fish. Another option is to increase bio media and thus bacteria levels. |
Waste from Falling Leaves and Cut GrassSkimmer NetPond Skimmer |
It may be great to have a large tree overhanging your pond for added shade, but there is often one downfall – leaves falling into your pond. The same problem occurs if you are not careful and grass cuttings also make their way into your pond. All this added debris eventually begins to breakdown in the bottom of your pond and provide nutrients for that green water to thrive. How to prevent? Many pond owners will install a skimmer (similar to that of a pools) to prevent debris from staying in their ponds. This option is a lot more maintenance free than your other options which is netting it out by hand. Some people will also net the entire pond – most often in the fall when the majority of the leaves will drop within a week. |
Fertilizers Leaching into your Pond |
This is a category that many pond owners are not aware of due to its lack of visibility. This can happen 2 ways:
This is why we often recommend that ponds are built in a raised area in the yard as opposed to a low lying area. As well, being vigilant to keep all fertilizers away from the pond. |
New pond water/ excessively changing water |
A lot of people believe that if their ponds are full of green water the best plan of action is to empty the pond, power wash it and fill it with new tap water. This option is great for the first couple days, but check back in a week and you will notice that green water coming back with a vengeance. The problem with this scenario is that we want to strive for a mature pond that has had the time to build up beneficial bacteria and have nutrient levels stabilize. When you empty the pond-power wash and refill, all of that new water is full of minerals and nutrients as well as your beneficial bacteria levels are practically starting from zero. This is why we promote small water changes (10-15%) weekly and work towards maturing our ponds with bacteria and oxygen (the fish much prefer this route as well!) |
Products to Help Eliminate Green Water
Our first course of action with any pond issue is to be proactive – looking at the cause and trying to prevent the issue from happening. But when green water happens most of us don’t want to wait weeks to see results. Below you will see products that aid in eliminating green water (suspended algae) as quickly and effectively as possible.
| Product Quick Overview | What it Does/When to Use |
|---|---|
CrystalClear D-Solv Oxy Pond Cleaner |
Pro Fix is a water treatment that eliminates green water in as little as 24 hours. This product should be used maximum once a week and is safe for ponds with fish and plants. Pro Fix is best used as a quick fix as opposed to a long term solution. Many people will use this product while they are waiting for their bacteria to mature and multiply in the beginning of the season or when we have heat spikes and the water takes a turn for the worst. *use with aeration present. |
UV Ultraviolet Clarifier |
UV Clarifiers work on all water than can pass through the system, which means they work excellent on green water. Most will see improvement within a few days and full clarity within a week so long as the unit is sized correctly to the pond. The pros of a UV Clarifier are that they are super effective with very little maintenance required and fast acting. The con is that the up-front cost is more than a water treatment, though many would agree that over the course of a year that it becomes cost effective compared to the on-going use of water treatments. |
Pressure Filter with UV |
Pressure Filters With UV Clarifiers incorporated are becoming the industry standard for ornamental ponds. These units have all of the same benefits as a UV Clarifier with the added benefit of having sponge media to filter out fine debris, bio media to increase your beneficial bacteria load as well as an easy to use back wash system that squeezes out the sponges using a handle without the owner having to open up the filter and get their hands dirty. |
Microbe-Lift PL |
Microbe-Lift is a specially formulated Beneficial Bacteria that has stood the test of time and has become the industry standard for beneficial bacteria. It is a fast acting bacteria that does wonders for all aspects of the pond. Many pond owners will use this bacteria to start their pond, due to it fast acting properties and effectiveness. This a trusted brand and product that has been a best seller for seeding filters and pond maintenance. Not only beneficial in clearing pond water, but also for maintain a healthy pond with proper nitrate cycle levels and therefore, healthy fish. |
Beneficial Bacteria For Ponds Dry |
Beneficial bacteria is a product every pond owner should use regardless of what filters, pumps and chemicals are being utilized in the pond. Beneficial Bacteria does not interact poorly with any other product. This is a product that we add to our ponds once a week as a maintenance dose and is very cost effective. The dry bacteria is more cost effective than the liquid, however the liquid bacteria is generally faster acting. This is why we often use the liquid in the early spring and late fall when we require more of a bacteria boost and use the dry bacteria through the remaining months of the summer/warm months. *if you are going to add one product to your pond weekly – choose beneficial bacteria. |
Beneficial Bacteria For Ponds DryCold Water Beneficial Bacteria (Liquid) |
Beneficial bacteria is a product every pond owner should use regardless of what filters, pumps and chemicals are being utilized in the pond. Beneficial Bacteria does not interact poorly with any other product. This is a product that we add to our ponds once a week as a maintenance dose and is very cost effective. The dry bacteria is more cost effective than the liquid, however the liquid bacteria is generally faster acting. This is why we often use the liquid in the early spring and late fall when we require more of a bacteria boost and use the dry bacteria through the remaining months of the summer/warm months. *if you are going to add one product to your pond weekly – choose beneficial bacteria. |
Rapid Clear |
Rapid clear is generally not a product that you would use weekly as maintenance, but instead a product to fix an issue a few times a year at most. Rapid clear is a flocculent that takes fine debris in the water that is not settling and clumps it together to clarify the water. When trying decide whether your water requires rapid clear – decide if the water is just green or both green and murky. If murkiness is involved – you may require the use of rapid clear flocculent. Most often ponds may require this water treatment after large rainfalls, or if runoff has entered the pond. Also make sure your fine filter pads are not backed up |
Filter Floss Bio-Media |
Bio Media ties in with beneficial bacteria. Beneficial bacteria requires surface area to attach to – and because the more beneficial bacteria in your pond the better – we try to increase surface area available in the pond. The best way to increase surface area is using bio media, which can come in different forms - Filter floss media, bio balls, bio rings etc. All of this media takes up very little room in filters to provide maximum surface area for beneficial bacteria. A small investment for huge payback – every pond can benefit from have bio media and beneficial bacteria. |
Fountains Care
- Water Level. Fountains will need to be topped off with water to ensure the pump remains totally submersed at all times. This is especially important in windy areas or if the fountain has high levels of splash. Water fill valves can be added to almost any fountain to automatically top up when water levels drop.
- Debris. The pump must remain debris free. Often leaves and sediment can build up depending on the location of the fountain.
- Cleaning. Fountain Cleaners may be used and are available in store for water quality maintenance. Do not use bleach as this will affect the stain and concrete on most fountains.
Fountains are a sight to behold in the summer months. Come winter, most people fear cracking or cover with them with large blue tarps that stand out like a sore thumb. We have a few suggestions that will help your fountain keep its splendour all year round!
- Winter Frost. Before winter or first frost, fountains should be raised off of the ground surface with risers to prevent it from soaking up moisture and freezing, which could cause crumbling on the bottom of the piece.
- Winter Protection. Remove all pumps, plugs, and small components from the fountain and store indoors. All water must be drained from the fountain. Ensure water does not accumulate in the basin or any bowl and freeze, as this may cause cracking. Campania covers may be used once the fountain is cleaned and free of water, as they are one way breathable (allow trapped moisture out, but rain and dust cannot enter) and come in a neutral tone that blends into any landscape. If the piece permits, it may be stored indoors.
- Salt & Chemical. Ensure your fountain is kept clear from harsh salts and chemicals, as these may damage the stains and/or concrete.
Many fountains will come with set-up instructions, or the retailer will have specific instructions available. There are a few general guidelines to follow for all fountain set ups.
- Ensure all pieces of the fountain are present before the set up begins.
- Create a level surface for the fountain to be set up on, usually aggregate or concrete.
- Test the pump in water before assembling the fountain.
- You may need to use silicone on the plugs for proper sealing.
- Use small shims to level the tiers of the fountain if required.
- Ensure no tubing is kinked during the time of set up.
- Be sure that the plug and receptacle are not exposed to any water, including potential splash from the fountain.
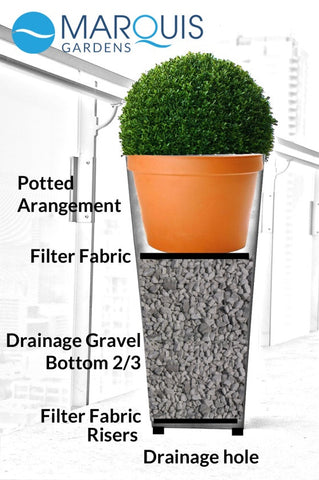
Planters Care
- Step #1. Place planters on small risers or decorative risers to allow for proper drainage.
- Step #2. Fill planters a minimum of 2/3 full, with clear gravel for drainage purposes.
- Step #3. Filter cloth can be placed on top of the gravel to prevent soil from draining through the bottom drainage hole.
- Step #4. Soil can then be put on top of the filter cloth and gravel, or for better results, have arrangement planted separately in a plastic container and place on top of filter cloth and gravel.

Remember: Trapped Water in Any Planter, Once Frozen, Will Expand and Cause Damage
Create Year-long Interest with planters! Your planters that were once blossoming and vibrant in the summer are now beginning to look spent as the cold weather sets in. If you are like us, you want your planters to be used year-round and are looking forward to decorating the planters for the winter season.
This can be done safely avoiding winter damage with the following tips:
- Winter Arrangements. All planters, no matter their material, can remain planted or decorated for the winter months so long as they have proper drainage and are raised above the frost line.
- Drainage. Your planter should have risers beneath them to ensure drainage hole does not freeze against the ground surface, as well as to remain above the frost line to prevent damage to the bottom of the planter. Planters should also be 2/3 full of ¾ or larger stone (used for drainage) to avoid a large amount of moist soil from freezing and expanding.
- Salt & Chemicals. Ensure planters are kept clear from harsh salts and chemicals, as these may damage the stains and/or concrete.
Use a soft cloth and vinegar to wipe down the planters
Statuary Care
Ensure your statue or bench is placed on a sturdy and level base of aggregate or stone throughout the frost-free months. Statuary or benches placed on grass or soil are not recommended.
Before winter or first frost, statuary and benches should be raised off of the ground surface with risers to prevent it from soaking up moisture and freezing, which could cause crumbling on the bottom of the piece.
Do not cover statuary or bench with plastic in the winter, as this may cause the piece to retain moisture which may then freeze. Often, plastic tarps can catch the wind causing the piece to knock over. Campania Covers may be used as they are one way breathable (allow trapped moisture out, but rain and dust cannot enter) or if the piece permits, it may be stored indoors.
How to Build
Koi ponds have variations in equipment due to the following:
- Surroundings - Are there threes in the area? You may need a skimmer. Rocky Soil? Make sure to use underlay material to prevent holes in your liner;
- Sun Exposure - Are you getting full sun to your pond all day? Make sure you have sufficient filtration – both Mechanical (UV) and Biological (Bio Media) to prevent heavy algae build up and green water;
- Size Of Pond - A larger pond makes it easier to keep your water levels balanced and also allows you to keep more pond fish and koi. Building a larger pond also means larger equipment is usually required, like pumps and filtration and liner. A 4ft depth at one point of your pond also allows you to keep koi and pond fish over winter in your pond;
- Quality Of Pond - Do you want as little maintenance as possible when it comes to your pond? There is a filter or product to keep your pond clean with very little effort! Think - having to net out leaves yourself VS a skimmer that can do the job for you! OR clean out filter pads yourself VS a filter with a backwash system.
| 10 Steps To Build A Pond | |
|
Step 1: Plan Ahead
|
 |
|
Step 2: Excavate
|
 |
|
Step 3: Place Equipment
|
 |
|
Step 4: Underlay/Liner
|
 |
|
Step 5: Adhere Liner
|
 |
|
Step 6: Rock In
|
 |
|
Step 7: Foam in Stream
|
 |
|
Step 8: Connection
|
 |
|
Step 9: Fill & Start
|
 |
|
Step 10: Finishing Touches
|
 |
Components Of A Koi Pond

|
Underlay Thick filter cloth material is used under liner for protection. Can also be used on top of liner under larger rockery. Must be installed during pond construction! |

|
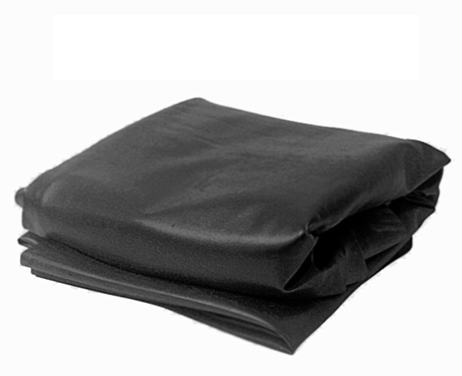
Liner EPDM Liner (45 mil) is used to line the pond and behind the falls/stream. This liner is flexible and durable. Must be installed during pond construction! |

|
Pvc Flex Pipe And Fittings, Glue And Primer PVC Flex pipe is used to connect pumps to filtration then to the spillway. PVC flex pipe is durable and flexible. PVC fittings are used in pond construction for durability to withstand sunlight and freezing. PVC glue and primer fuse the fitting to the pipe. Must be installed during pond construction! |

|
An up-flow filter or spillway is used at the top of the falls or stream to diffuse the water and provide even falls. An up-flow filter also provides additional filtration once filled with Bio Media. Must be installed during pond construction! |

|
Skimmer A skimmer using a skimmer pump draws the surface water into a basket or net to keep the surface clear of debris ie. leaves. Must be installed during pond construction! |

|
Skimmer Pump A skimmer pump is a submersible pump that is placed within the skimmer to draw in the surface water and circulate it back up to the spillway. Must be installed during pond construction! |

|
Pressurized Filter With UV A pressurized filter cuts down on much of the manual cleaning of the pond. A solids handling pump at the bottom of the pond feeds the bottom water (sludge and debris) into the pressurized filter. The pressurized filter has a backwash system that cleans itself with a few pumps of a handle. A UV system is often incorporated into a pressurized filter to keep the water clear of suspended algae (green water). Can be added during construction or after construction. Easier to add during construction! |

|
Solids Handling Pump A solids handling pump can handle small debris and sludge and therefore is placed at the bottom of the pond. The pump feeds the debris and sludge into the pressurized filter and back up to the spillway or directly back into the pond. Can be added during construction or after construction. Easier to add during construction! |

|
Aerator Pond aerators oxygenate your pond water. Every process in your pond depends on oxygen. Oxygen levels drop in higher heat and at night; this is why supplemental aeration is required. Pond aerators also provide oxygen in the winter months. A great way to save energy by turning your waterfall off at night, allow your aerator to oxygenate! Can be added during construction or after construction! |

|
Ionizer An ionizer releases ions into the water through a probe which is placed in the pipe line, in the skimmer or in a stream. An ionizer is the only mechanism that can control/eliminate string algae. Can be added during construction or after construction! |

|
Float Valve Or Electronic Water Level Controller A float valve or electronic water level controller maintains a constant water level in your pond. It easily connects to a ½” water supply line. These units ensure your pond water never drops too low. Often installed into skimmers. Can be added during construction or after construction! |

|
Additional UV Additional UV filters may be needed in a pond if water clarity is lacking. A UV sterilizer/clarifier can be added in-line anywhere from the skimmer pump to the spillway. Can be added during construction or after construction! |

|
Lighting Pond lighting can be used in or out of water. Pond lighting allows you to view your pond at night when most people are home or entertaining. Can be added during construction or after construction! |

|
Pond De-Icer A pond de-icer is a unit used to create a small hole in the surface of your pond during the winter months and insures proper gas exchange to keep the fish alive through the winter. These units are thermostatically controlled, making them cost effective. Must be used during winter months! |

|
Fish Either pond fish or koi can be kept in a pond. If you are looking to over-winter your fish a pond, ensure one part of the pond is 4 ft deep for the fish to go dormant in. A pond de-icer and aerator should be used in the winter. Let new pond run for at least a week with beneficial bacteria and plants before adding fish. Use a dechlorinator! |

|
Plants Plants provide the necessary shade and hidden cover for fish. They provide oxygen during daylight hours and filtration. Plants are used for decorative purposes to provide a more natural look to any pond. Add only once the water temperature has become equal to what the plants were accustomed to! |
Pond Layout


A Bubble Rock Is An Entry-level Water Feature That Is Fast And Easy To Install And Low Maintenance. Bubble Rocks Are The Versatile Feature That Can Fit Into Any Landscape – From Contemporary To Naturalistic!
Installing A Bubble Rock or Urn Feature:
- Trace the outline of the basin on the ground. Dig a hole the size of your basin. Ensure the ground is level and firm. The basin should never be below soil grade - If it rains, soil runoff could enter your basin.
- Place basin in the dug-out hole and back fill. Basin should be level and sturdy. Additional block supports can be used to support the top grate if necessary (heavy rock or urn).
- Place your rock(s) or urn on the basin and ensure they are stable and not blocking the pump access point.
- Connect pump, tubing and valve to the bubble rock(s) or urn using the access hole in the basin. Test pump pressure and adjust valve to your desired flow. The tubing may require silicone inside the hole to prevent water from seeping back down.
- Water features are viewed most often at night, which makes lighting them more important. Up-lighting highlights bubbling rocks and urns, allowing the water to shimmer when the sun sets. Water proof spotlights are also easy to install.
- Finally, fill the basin with water and test the pump and water flow (adjust valve to what you like). Cover the basin using pre-washed decorative stone. Plants can be added beside the rock feature for a natural touch.
A pondless water feature has no open body of water at the end of the falls. Instead, the water is held within water retention cubes, which are durable, allowing a decorative stone, like river rock, to be placed on top; this gives off an overall effect of water “disappearing” into a bed of stone.
Benefits of a Pondless Waterfall:
- Safety. Pondless features are a great choice if you have any concerns for small children and open bodies of water.
- Maintenance. Because there is no open water, maintenance is cut down drastically! No concern for water clarity and filtration is cut in half! Enjoy the sound of water and view of a waterfall with minimal hassle.

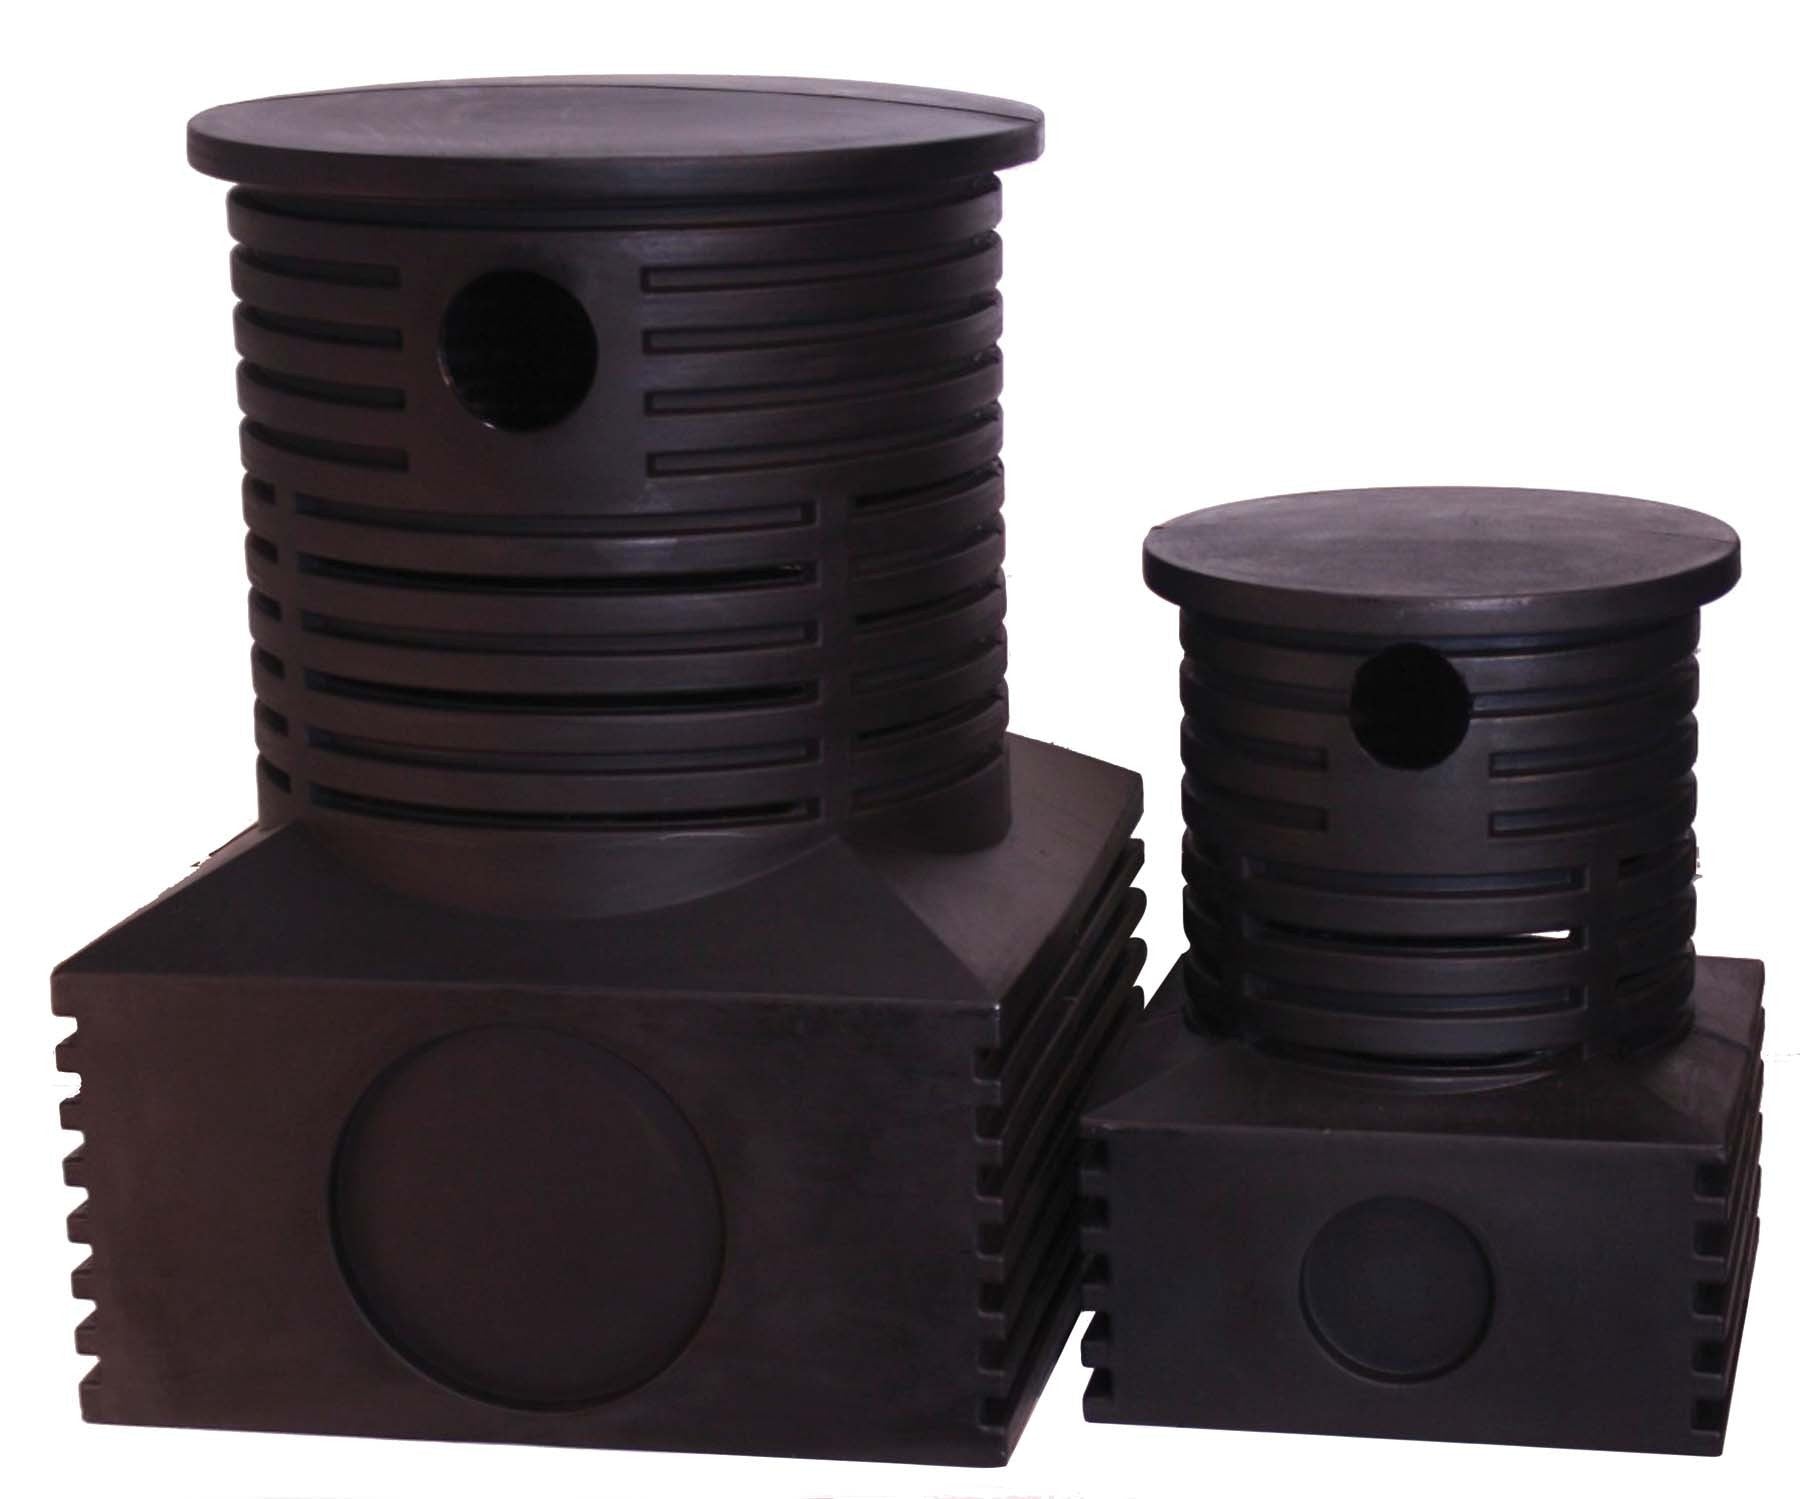
Pump vaults are extremely durable and allow for easy access to the pump and allows you to view the water level if needed. Pumps vaults give the pump open space around its intake to prevent clogging.
| Components Of A Pondless Feature | |
|---|---|
|
Diffuser/Spillway A diffuser or spillway starts the waterfall or stream. It allows water to flow evenly and can handle high volumes of water. It can also withstand heavy rocks or aggregate being placed directly on top. Must be installed during construction process! |

|
|
Water Retention Cubes Water retention cubes are used in the water reservoir to retain more water than gravel or any other aggregate. They can bear heavy weight, do not clog like an aggregate could, allow for a smaller reservoir due to their water retention capacity and are lightweight and easy to install. Must be installed during construction process! |

|
|
Pump Vault Pump vaults are extremely durable and allow for easy access to the pump and allows you to view the water level if needed. Pumps vaults give the pump open space around its intake to prevent clogging. Must be installed during construction process! |
|
|
EPDM Liner & Underlay EPDM Liner (45 mil) is used to line the pond and behind the falls/stream. This liner is flexible and durable. Thick filter cloth material is used under liner for protection. Can also be used on top of liner under larger rockery. Must be installed during construction process! |
|
|
Submersible Pump A submersible pump is placed within the pump vault beneath water. This pump circulates the water back up to the spillway. Must be installed during construction process! |

|
|
PVC Flex Pipe And Fittings, Glue And Primer PVC Flex pipe is used to connect the pump to the spillway. PVC flex pipe is durable and flexible. PVC fittings are used in pond construction for durability to withstand sunlight and freezing. PVC glue and primer fuse the fittings to the pipe. Must be installed during construction process! |

|
|
Waterfall Foam Waterfall foam is expanding foam that is used between the rockery within the stream to prevent the running water from falling between the rocks. It allows the stream water to be more visible.Must be installed with dry stone! |

|
|
Float Valve or electronic Water level Controller A float valve or electronic water level controller maintains a constant water level in your pond. It easily connects to a ½” water supply line. These units ensure your pond water never drops too low. Can be installed in the pump vault. Optional! |

|
|
Check Valve or Ball Valve A check valve or a ball valve is used within the pump vault, in-line to prevent the water that is stored in the flex pipe from draining back into the reservoir once the feature is turned off. This prevents overflow of the reservoir when the feature is turned off. Optional! |

|
|
Ionizer An ionizer releases ions into the water through a probe which is placed in the pipe line, in the skimmer or in a stream. An ionizer is the only mechanism that can control/eliminate string algae that can build up on your rocks and stream. Optional! |

|
|
Rockery Any form of rockery can be used for a pondless feature. Usually a mix of large and small rockery with river rock provides a natural setting and is easy to work with while constructing the stream or falls. Must be installed during construction process! |

|
| 8 Steps To Install A Pondless Water Feature | |
|
Step 1: Plan Ahead Begin by determining how large of a feature you are looking to create. Use the following formula to determine your reservoir size and the amount of flow you will require. Many people will undersize their reservoir, unaware of how much water is required for their entire stream. Reserviour Size
Calculating Waterfall Flow Rate
Width Of Spillway X Desiered Flow Rate = Total Gph EXAMPLE: Waterfall with a 24" wide spillway:
|
 |
|
Step 2 Begin by determining how large of a feature you are looking to create. Use the following formula to determine your reservoir size and the amount of flow you will require. The soil being removed can be used to build up where the stream will be located. |
 |
|
Step 3 Line the stream and reservoir with one piece of underlay then EPDM liner. Ensure your liner overlaps the edges to prevent shifting and leaks over time and that the edges are higher than the water line |
 |
|
Step 4 Place your up -flow filter/ spillway/diffuser at the top of your stream. Your liner should go behind the diffuser or attach to the front plate of the up flow filter/ spillway. Ensure the waterfall starter is level and sturdy. |
 |
|
Step 5 Place your water retention cubes in the reservoir along with the pump vault. A snug fit is best for a sturdy reservoir. The pump can be placed within the vault. Connect the spillway to the pump using PVC Flex pipe. Near the pump, install a check valve to prevent the water in the pipe from draining back into the reservoir when the pump is turned off. A valve is also handy to control the water volume. |
 |
|
Step 6 Get creative! Using the rockery of your choice, begin around the spillway and stream, ensuring the liner does not get folded down, which may cause a leak. Begin with your largest stones and fill in with the smaller stones. Pond foam can be used in the stream to fill in between larger rocks and prevent the water from disappearing under the stones. |
 |
|
Step 7 Cover the water retention cubes and pump vault with decorative stone. The pump vault lid should remain accessible by lightly covering it with decorative stones. |
 |
|
Step 8 Fill reservoir with water and turn on the pump. Ensure no water is being diverted from the stream by any of the rockery. Add Finishing Touches. Add plants and lighting to highlight your feature! |
 |
